
前
在构思一个项目,把一些需要经常变更的云上配置通过一种可持续的方式管理起来。最终实现的目的是云上用到的配置都可以通过代码来进行定义。不需要手动的控制台点击,同时可以加强IAAS的使用能力
这里使用的技术栈有
- Github Action
- Terrafoem
- cf-terraforming`
The part of Terraform
安装 cf-terraforming
安装 cf-terraforming 用于导出现有的配置生成Terraform 的文件。
brew tap cloudflare/cloudflare
brew install cloudflare/cloudflare/cf-terraforming
一路绿灯完成安装。没有什么问题
导出现有的Cloudflare tf内容以及状态导入
Terraform对资源是声明式的管理,存在状态文件和 配置文件两部份。状态是自动生成的我们不需要进行编辑。但是在导入资源的时候也需要进行同步的导入。
使用 cf-terraforming 进行tf文件生成, 这里的 API token 在控制台进行生成
export CLOUDFLARE_API_TOKEN='<SECRET>'
export CLOUDFLARE_ZONE_ID='<SECRET>'
cf-terraforming generate \
  --resource-type "cloudflare_record" \
  --zone $CLOUDFLARE_ZONE_ID > cloudflare_record.tf
完成命令后,就得到了母亲该Zone下的所有的域名record,看其中的一条是下面的样子,这样就完成了声明文件部份的导入
resource "cloudflare_record" "terraform_managed_resource_17cf372edb00f60acd922085ccfe4992" {
  name    = "78cbbfaad12b999e"
  proxied = false
  ttl     = 1
  type    = "A"
  value   = "43.153.xxx.xxx"
  zone_id = "secret"
}
下面的步骤是进行 状态文件的导入。通过 cf-tf 工具自动生成导入资源的 import 命令。然后使用 terraform 来进行资源的状态导入
cf-terraforming import \
  --resource-type "cloudflare_record" \
  --zone $CLOUDFLARE_ZONE_ID
这一步不会直接生成 state文件而是给出了使用terraform资源导入的命令 比如下面的
terraform import cloudflare_record.terraform_managed_resource_af4a02bee8b9cb86c4a659cf827753fd d904f98aee09a6c74f1ded71b4100a4a/af4a02bee8b9cb86c4a659cf827753fd
终端批量执行命令。完成资源导入。
执行 terraform plan 来检查目前的状态是否正确
No changes. Your infrastructure matches the configuration.

Terraform has compared your real infrastructure against your configuration
and found no differences, so no changes are needed.
可以看到,现在我们本地的配置和 远程配置没有差异。
远程状态存储
可以看到本地的目录下有 tfstate 的文件,这个也就是我们的现在资源所有的状态文件。但是本地管理的方式无法在协作环境中使用。而且后续的自动变更之类的 CI操作也无法完成。所以这里我们需要把状态进行远程存储。在main.tf 中添加下面内容指定远程存储。
这里使用的是 TFC Terraform Cloud 提供的免费的配置托管服务。但是企业用户是需要收费的。
terraform {
  cloud {
    organization = "minsk"
    workspaces {
       name = "cloudflare"
       }
    }
  }
之后在 TFC 注册帐户建立项目,在现有的tf项目中执行
terraform login
terraform init
login 阶段会连接到 TFC, init 的步骤中 会提醒你是否将 状态文件同步到远端。yes 之后一键绿灯。
terraform plan
而后我们再次执行 terraform plan 的时候,会在终端看到。运行apply 的命令已经不是在本地了,而是一个远程的任务。我们的状态迁移也完成了
Running apply in Terraform Cloud. Output will stream here. Pressing Ctrl-C
will cancel the remote apply if it's still pending. If the apply started it
will stop streaming the logs, but will not stop the apply running remotely.

Preparing the remote apply...

To view this run in a browser, visit:
https://app.terraform.io/app/minsk/cloudflare/runs/run-xxxxxx

Waiting for the plan to start...

Terraform v1.3.9
on linux_amd64
Initializing plugins and modules...
The part of Github Action
配置文件推送到 Github 存储
初始化本地仓库,然后完成推送。常见命令不进行赘述。
echo "# base-iaas" >> README.md
git init
git add README.md
git commit -m "first commit"
git branch -M main
git remote add origin [email protected]:r4ym0n/base-iaas.git
git push -u origin main
导入Github action
在github 页面,点选github Action 之后搜索 terraform 就可以得到一个默认配置的文件。上面的注释文件也说明了自己的用途。
# This workflow installs the latest version of Terraform CLI and configures the Terraform CLI configuration file
# with an API token for Terraform Cloud (app.terraform.io). On pull request events, this workflow will run
# `terraform init`, `terraform fmt`, and `terraform plan` (speculative plan via Terraform Cloud). On push events
# to the "master" branch, `terraform apply` will be executed.
action 的文件重要的部份,贴在下面做一个解读.
分两部分来,第一部份是定义触发的部份。 这里on 两个 event。
- push 到 master分支会出发
- 有新的PR会进行触发
name: 'Terraform'

on:
  push:
    branches: [ "master" ]
  pull_request:

permissions:
  contents: read
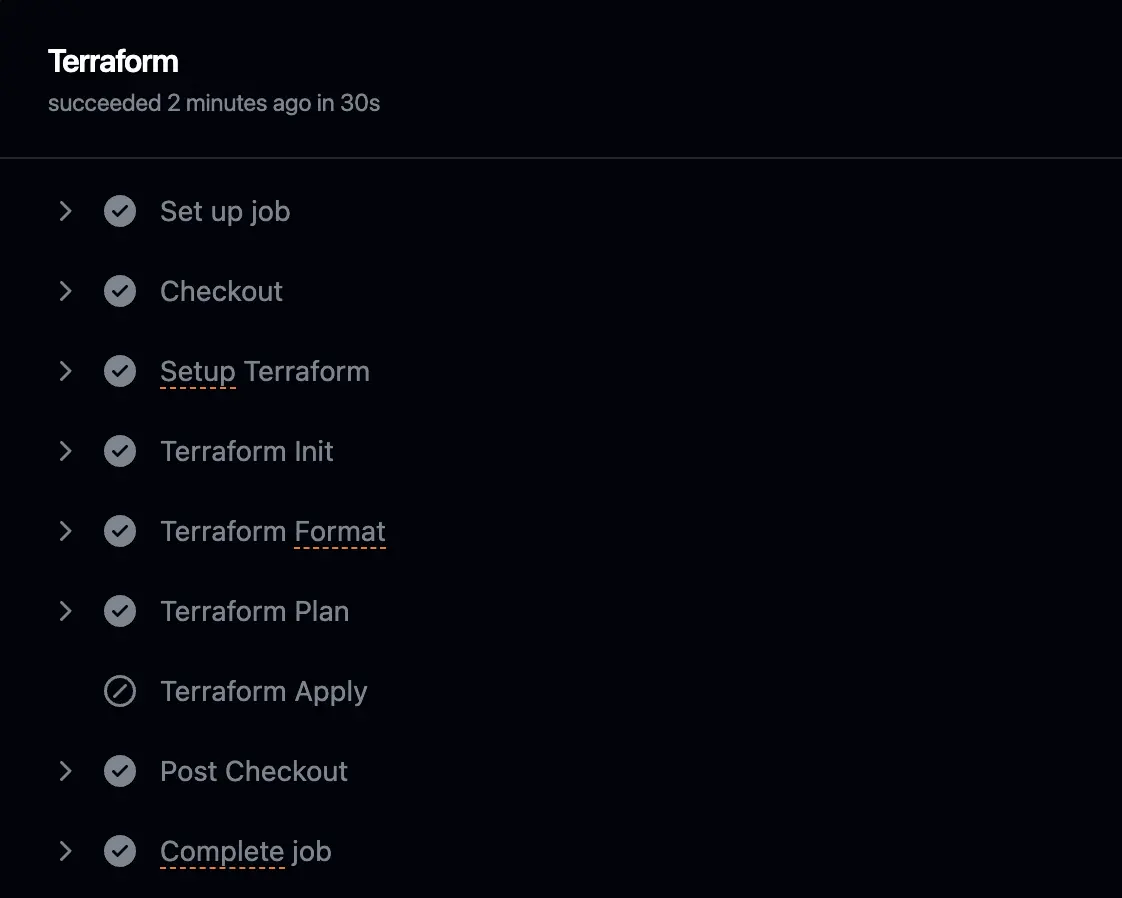
后面的部份是比较重要的,Job 的定义,注意有下面的流程
- 指定基础环境
- 获取代码
- 初始化terrafoem 环境
- 格式化以及预检查
- 判断是否master分支,master 分支就apply,其他分支说明是PR的不需apply
uses 的部份是直接使用定义好的 action 仓库来实现 run-on 这个虚拟环境内的一些功能。
steps 是已经在虚拟环境内了,所以 checkout 和 setup-terraform 都是用来初始化这个环境的工具。
- actions/checkout 把我们的代码 checkout 到虚拟环境中
- hashicorp/setup-terraform 来在虚拟环境初始化terraform
上面的初始化完成之后,加可以直接run 命令来完成 配置的变更啦
jobs:
  terraform:
    name: 'Terraform'
    runs-on: ubuntu-latest
    environment: production

    # Use the Bash shell regardless whether the GitHub Actions runner is ubuntu-latest, macos-latest, or windows-latest
    defaults:
      run:
        shell: bash

    steps:
    # Checkout the repository to the GitHub Actions runner
    - name: Checkout
      uses: actions/checkout@v3

    # Install the latest version of Terraform CLI and configure the Terraform CLI configuration file with a Terraform Cloud user API token
    - name: Setup Terraform
      uses: hashicorp/setup-terraform@v1
      with:
        cli_config_credentials_token: ${{ secrets.TF_API_TOKEN }}

    # Initialize a new or existing Terraform working directory by creating initial files, loading any remote state, downloading modules, etc.
    - name: Terraform Init
      run: terraform init

    # Checks that all Terraform configuration files adhere to a canonical format
    - name: Terraform Format
      run: terraform fmt -check

    # Generates an execution plan for Terraform
    - name: Terraform Plan
      run: terraform plan -input=false

      # On push to "master", build or change infrastructure according to Terraform configuration files
      # Note: It is recommended to set up a required "strict" status check in your repository for "Terraform Cloud". See the documentation on "strict" required status checks for more information: https://help.github.com/en/github/administering-a-repository/types-of-required-status-checks
    - name: Terraform Apply
      if: github.ref == 'refs/heads/"master"' && github.event_name == 'push'
      run: terraform apply -auto-approve -input=false
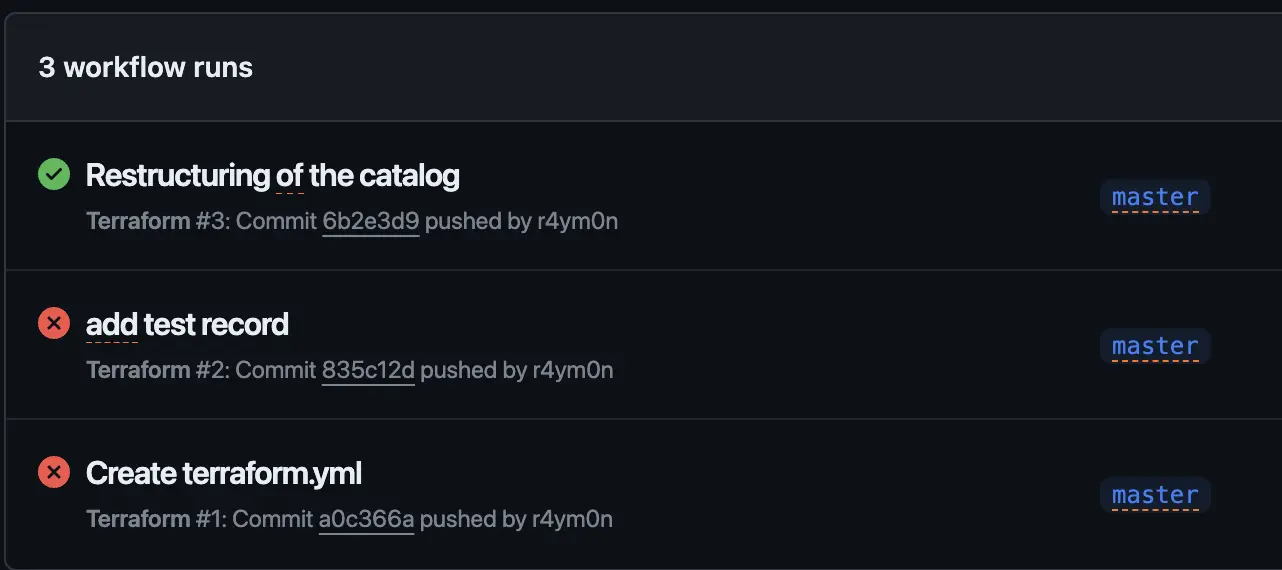
之后我们commit 这个变更,action 文件会自动的添加到我们的仓库。我们尝试修改我的tf文件。可以看到Workflow 会自动执行
运行效果
后
算是一个比较综合的实践,作为Devops 的基础能力,需要掌握和熟练使用。